Friday, December 14, 2012

Recommended MySQL Cluster setup

MySQL Cluster was first released in November 2004, in MySQL 4.1 - that’s a pretty mature nine-year old! There is a ton of information about it on the Internet, on topics like how to setup a good minimal cluster, how to distribute the nodes, the kind of hardware that is appropriate for each node type, etc. We published our MySQL Cluster training slides sometime back. However, despite all that information, we still see many testers who do not get the basics right.
In this blog, we will see what a good MySQL Cluster setup looks like.

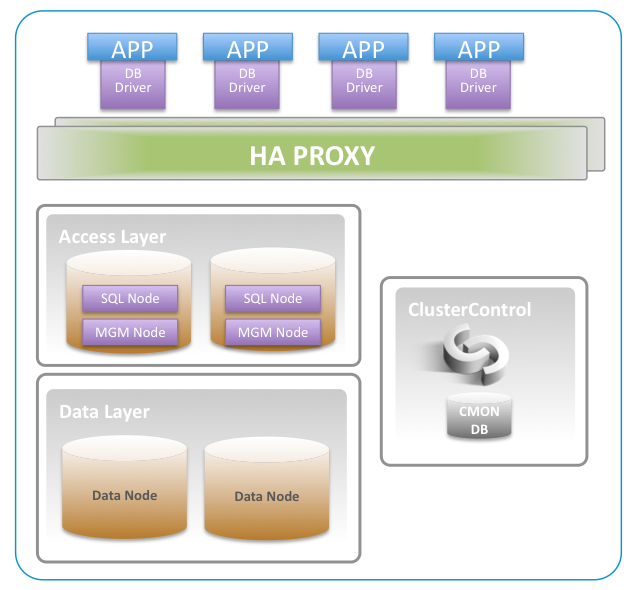
MGM Node -  holds the configuration for MySQL Cluster in a file called config.ini. It also writes a cluster log, and takes part in arbitration to prevent split-brain or network partitioning.
You are recommended to have two MGM Nodes for redundancy. Since MGM hardly use any resources, and is not involved in query processing or routing of requests, it can be colocated with the SQL Nodes/Access Nodes.

Data Node - stores the data and the tables. Tables are divided up into partittions, and the number of partitions depends on the number of data nodes (and the number of Local Query Handlers). Data distribution is automatic and by default is based on the hash of the primary key to conclude which partition a particular data item should be written. You can also partition the data on part of the Primary Key (using PARTITION BY KEY(part_of_pk) if you want to group e.g users together with its associated data.  

The data nodes takes cares of managing the transactions, recovery, etc etc. Failover is automatic, but  the application is responsible for retrying failed transactions. Data can either be written in in-memory tables (fastest) or on disk tables (slower).

For redundancy you need at least two data nodes. Data nodes usually operate in pairs, so the number of data nodes would be two, four, six, etc. The data nodes should have many cores, fast cores, enough RAM to store your data, and fast disks (SAS 10-15KRPM and/or SSD for disk data tables). On EC2, IOPS instances are prefered.

Since the Linear two-phase commit protocol is used to write data onto two partitions (synchronous replication between data nodes) it is recommended to have as fast network as possible, 1 Gig-E, 10Gig-E, Infiniband or even Dolphin ICS IX PCI Express adapters.

Distributing Data Nodes that belong to one cluster over WAN is generally not recommended, unless the WAN connection is very stable and the latency is very low (at most a few milliseconds).

SQL Node / Access Node - the most common way to read/write data to the Data Nodes is by using the MySQL Server (aka SQL Node). A query comes into the SQL Node. The SQL Node parses, optimizes and executes the query on the Data Nodes.  Other ways of connecting to the Data Nodes includes Cluster/J (Java driver), Memcached, or directly from the NDBAPI (C++) api. All methods mentioned above accessing the Data Nodes boil down to the NDBAPI requests being sent across the wire.

You need at least two SQL Nodes for redundancy. Nodes in the access layer should have fast CPUs, disks are not important, fast network to the data nodes (same specs as for the data nodes), and about 2+ GB of RAM (depending on the number of connections, per thread buffers etc). Do not co-locate the SQL Nodes/Access Nodes with the Data Nodes.

SQL Load Balancing with HAProxy - HAProxy is a load balancer, and load balances application requests to multiple SQL Nodes. We recommend 2 instances of HAProxy for redundancy. HAProxy has neat features like queuing and throttling of connections towards one or more SQL Nodes, which is great for overload control. Unless you have 10 or more app servers, we recommend to deploy the HAProxy servers directly on the machine running the app servers.

ClusterControl - This is a management server that gives a single, consolidated view of all the nodes in the cluster. It collects status information from all the nodes, and reacts on this information to provide automatic recovery, scaling/add nodes, health reports, query monitoring, notifications, and backup. Requires approx 2 CPU cores, 16Gb of disk space, and at least 1GB of RAM.
We recommend that you do not co-locate the ClusterControl server with any node that is part of the MySQL Cluster setup.

Putting it all together:


Bare metal or Virtualized platform?

Generally, you can run MySQL Cluster on virtualized hardware if you keep attention to:

  • Latency
  • Disk speed

The Data Nodes are the ones that are most sensitive. Cloud servers work fine as well. As an example,
Paypal deploys a number of MySQL Clusters on Amazon. They use small AWS instances for their MGM and SQL nodes, but XL instances for Data Nodes.


If you e.g use VMWare, then you want to have:

  • nodes in one node group running on separate instances, and those instances should be on different physical hosts. Else if the host goes down, the entire node group will go down, and then the entire cluster
  • the physical host running as few instances as possible
  • as less sharing of possible of the physical hosts resources (like CPU and disk) - you don't want two data nodes share the same physical core e.g.

Tuesday, October 23, 2012

Hotbackup of Galera Cluster for MySQL using Xtrabackup


Hot backups are important for high availability, they can run without blocking the application. Percona Xtrabackup is a great tool for backing up InnoDB data. 
We have created a backup tool called s9s_backup that makes Xtrabackup really easy to use, and is fully integrated with ClusterControl, which means that you can schedule backups with ease and view the backups that you have taken, and also restore the backups with no pain.
s9s_backup is available in the lastest version of ClusterControl or you can download it here.

Is mysqldump totally useless then?

No. If you would like to isolate and load only one table, mysqldump is great, or if you want to load your data into another storage engine or database (e.g. NDB). Then mysqldump comes in very hand. Within ClusterControl you can create schedules to make a mysqldumps, full and incremental backups using Xtrabackup.

How to use s9s_backup

s9s_backup is included in ClusterControl and automatically installed in either /usr/bin or /usr/local/cmon/bin
Running/usr/bin/s9s_backup prints out the set of options that s9s_backup supports:
/usr/bin/s9s_backup <--backup|--list|--install|--purge|--restore>  

Full Backup

/usr/bin/s9s_backup --backup full  /path/to/my.cnf     <backupdir>
This will take a full backup of the host where you run the tool and store the backup in <backupdir>/full/backupdir.
s9s_backup writes a log  (you can change it easily in the s9s_backup script if you want it on screen instead) to /tmp/s9s_backup.log.
Status information is written into the CMON Database, so you can see if a backup has failed or succeeded, size information, md5 etc.

Incremental Backup 

/usr/bin/s9s_backup --backup incr  /path/to/my.cnf    <backupdir>
This will take an incremental backup of the host where you run the tool and store the backup in <backupdir>/incremental.

In order to take an incremental backup you must have already made a full backup on the host. So when creating the backup schedule (in either cron or ClusterControl), make user the first backup that will run is a full backup, else the incremental backups will fail.
s9s_backup writes a log to /tmp/s9s_backup.log

List backups

/usr/bin/s9s_backup --list
This prints out a list of backup sets (a full backup plus the subsequent incremental backups) together with a backup id. This is called the backup set:
root@server01:~# ./s9s_backup --list
===========================================================================
Full backup taken '2012-October-23_07:40:37':
   server:     server01
   backup set: 2
   status:     completed
   location:   /backups//full/backup-full-...tar.gz (796873 bytes)
   lsn:        8791838
   md5:        31f84543c997a28a6bca7917776a5fac
   >> incremental backup taken '2012-October-23_07:58:48':
      server:   server01
      parent:   2
      status:   completed
      location: /backups//incremental/backup-incr-...tar.gz (2037959 bytes)
      lsn:      35177200
      md5:      5f845dd7a478fa0a99b4d97f6868c747
The list of a backup set is ordered by the LSN (Logical Sequence Number) and the backup, once restored, will be restored in LSN order.
The incremental backups have as parent the full backup, so you can verify that the incremental backup indeed belongs to the correct backup set (parent). Orphaned backups cannot be restored.&nbsp

Restore backups 

Do not try to unpack the files in the backup set files manually. Instead you should use s9s_backup’s restore option to do it in the correct way and in the correct order:
/usr/bin/s9s_backup --restore <backup id>  <my.cnf>  <restoredir>
To restore a backup, you must specify a backup set id. From the ClusterControl Web interface you can easily see which backup files are part of a backup set, or you can run the --list command.

The restoredir specifies where the restored backup files in the backup set will be applied and combined by xtrabackup. Please note that the restoredir is not, and must not be the same as the mysql datadir.  The increments are restored in LSN order to ensure you have a consistent restore point. This means that you as a user don’t have to worry about what order to apply the increments in. s9s_backup takes care of that, which is great when you are under pressure.

When restoring, s9s_backup compares the md5sum of the backup files when the backup was taken with the backup files that are currently restored. If there is a mismatch, s9s_backup will abort the restoration.

Once the restore is completed, the restoredir contains a complete restored backup that can be copied back to the mysql datadir.

Assuming you have a total cluster crash, and the cluster is unable to repair itself, then do on one node only:
  1. Make sure that the ClusterControl controller is stopped to prevent auto-recovery (you are now in charge of the recovery). On the controller do: service cmon stop
  2. Verify the other mysql servers are stopped.
  3. cd <restoredir>/<backup set id>
  4. make sure the is empty (use e.g rm -rf /var/lib/mysql) before running the innobackupex –copy-back command in the next step
  5. innobackupex  --copy-back  <restoredir>/<backup set id>
  6. chown mysql:mysql –R <mysql datadir>
  7. mysqld_safe --defaults-file=/path/to/my.cnf --wsrep-cluster-address='gcomm://' &  
  8. Start the ClusterControl controller (on the controller do: service cmon start),and it will orchestrate the synchronization of the other nodes.

Purge backups 

If you want to purge old backups, or failed backups, you can do:
/usr/bin/s9s_backup --purge <retention_period>   
Backups older than retention_period will be removed from the file system.
The retention, if not specified on the command line, will be fetched from the cmon database (in the cmon_configuration table), which you can set from the Web interface under Cluster Settings.

Installation of Xtrabackup and Cron Job

If Percona Xtrabackup is not already installed, then s9s_backup will automatically download and install Xtrabackup.
To install Xtrabackup and to also install a cron job do:
/usr/bin/s9s_backup --install cron
The 'cron' at the end means Install Cron job.
This will install Percona Xtrabackup on this server, but no cron job:
/usr/bin/s9s_backup --install 
In both cases above, the Percona Xtrabackup will be downloaded and installed.
The cron job is defined in the s9s_backup script, and you can easily modify it to suit your needs. The cron job is installed in /etc/cron.d/s9s_backup
The cron job will take a full backup every Sunday at 0300 and then incremental backups Mon-Sat at 0300.

If you want to modify the cron job table you can do it directly in the s9s_backup script or post installation by changing /etc/cron.d/s9s_backup

Finally, you can of course edit, change and make whatever modifications you like to the s9s_backup script if you want to customize it further.

Monday, September 24, 2012

garbd - How to avoid network partitioning or split brain in a Galera Cluster


Network partitioning (aka split brain) is something you don’t want to happen, but what is the problem really?

Sometimes, users set up a Galera Cluster (or Percona XtraDB Cluster) containing an even number
of nodes, e.g, four or six nodes, and then place half of the nodes in one data center and the other half in another data center. If the network link goes down between the two data centers, then the Galera cluster is partitioned and half of the nodes cannot communicate with the other half. Galera’s quorum algorithm
will not be able to select the ‘primary component’, since both sets have the same number of nodes. You then end up with 2 sets of nodes that are ‘non-primary’, and effectively, none of the nodes would be available for database transactions.

Below is a screenshot of ClusterControl for Galera. I have simulated a network partition by simply killing two of the nodes at the same time.

Network partitioning / split brain
Half of the nodes got disconnected from the other nodes. The nodes staying up cannot determine the state of the other nodes, e.g, if they are really down (dead process), or if it was just the network link that went down and the processes are still up. Continuing then would be unsafe, and the two separated halves could potentially drift away, and you would have an inconsistent database.

At this point, our 2 nodes are pretty useless; at least one node should be in state ‘synced’ before it can be accessed. ClusterControl will address this situation by first recovering the first two nodes in ‘non-Primary’ state and setting them to Primary. It will then resync the two crashed nodes when they are back.

In order to avoid this, you can install an arbitrator (garbd). garbd is a stateless daemon which acts as a lightweight group member. In a quorum situation where half of the nodes are not available, garbd will help avoid a split-brain.

In ClusterControl, garbd is a managed process (will be automatically restarted  in case of failure) and can easily be installed from the deployment package:

./install-garbd.sh

Now that we have installed garbd in our 4-node test cluster, it will now consist of 1+4 nodes. Killing 2 nodes will not affect the whole cluster, as the remaining nodes will have the majority, see the picture below The minority will be excluded from the cluster, and when they are up and ready to rejoin the cluster, they will go through a recovery protocol before being accepted into the cluster.

Majority win - garbd + two survivors > two failed nodes
Hopefully this gives an idea how and why garbd comes in handy.

Tuesday, September 11, 2012

MySQL Cluster to InnoDB Replication Howto


In this blog post I will show you how to setup a replication from MySQL Cluster  (ndbcluster) to a regular MySQL Server (InnoDB). If you want to understand the concepts, check out part 7 of our free MySQL Cluster training.

First of all we start with a MySQL Cluster looking like this, and what we want to do is to setup replication server to the Reporting Server (InnoDB slave).


MySQL Cluster is great at scaling large numbers of write transactions or shorter key-based read querise, but not so good at longer reporting or analytical queries. I generally recommend people to limit analytical/reporting queries on the MySQL Cluster, in order to avoid slowing down the realtime access to the cluster. A great way of doing that is to replicate the MySQL Cluster data to a standalone MySQL Server.  

To achieve that, we will need a replication server. All data written into NDBCLUSTER is sent as events to the replication server. A MySQL Server can be turned into a replication server by specifying --log-bin. The replication server then produces a binary log, which can be replicated to a standalone InnoDB. 

(NOTE: For redundancy, it is possible to have 2 replication servers. We will cover that in a separate blog.)


Replication Layer Configuration
In the my.cnf of the replication server you should have the following:
[mysqld]
...
#REPLICATION SPECIFIC - GENERAL
#server-id must be unique across all mysql servers participating in replication.
server-id=101
#REPLICATION SPECIFIC - MASTER
log-bin=binlog
binlog-do-db=user_db_1
binlog-do-db=user_db_2
binlog-do-db=mysql
expire-logs-days=5
...
You may want to skip  the binlog-do-db=.., if you want to replicate all databases, but, if you want to replicate a particular database, make sure you also replicate the mysql database in order to get some very important data on the slave.

Restart the replication server for the settings to have effect.
Grant access to the Slave:

GRANT REPLICATION SLAVE ON *.* TO 'repl'@'ip/hostname of mysqld m' 
  IDENTIFIED BY 'repl';

InnoDB Slave Configuration
The first requirement on the InnoDb slave is that it must use the mysqld binary that comes from the MySQL Cluster package. If you already have a MySQL 5.5 installed that is not clustered, you need to upgrade it to the Cluster version of it. E.g, by doing:

sudo rpm -Uvh MySQL-Cluster-server-gpl-7.2.7-1.el6.x86_64.rpm
sudo rpm -Uvh MySQL-Cluster-client-gpl-7.2.7-1.el6.x86_64.rpm

The InnoDB slave should have the following:

[mysqld]
...
binlog-format=mixed
log-bin=binlog
log-slave-updates=1
slave-exec-mode=IDEMPOTENT
expire-logs-days=5
...

If you want the InnoDb to further replicate to a set of slaves, then you should set log-slave-updates=1 otherwise you can set it to 0 (log-slave-updates=0). Thatt is all, restart the slave.

You must also create the following table on the Innodb Slave:

use mysql;
CREATE TABLE `ndb_apply_status` (
`server_id` int(10) unsigned NOT NULL,
`epoch` bigint(20) unsigned NOT NULL,
`log_name` varchar(255) CHARACTER SET latin1 COLLATE latin1_bin NOT NULL,
`start_pos` bigint(20) unsigned NOT NULL,
`end_pos` bigint(20) unsigned NOT NULL,
PRIMARY KEY (`server_id`) USING HASH)
ENGINE=INNODB DEFAULT CHARSET=latin1;

Then do CHANGE MASTER:
CHANGE MASTER TO MASTER_HOST='ip/hostname of the replication server', MASTER_USER='repl', MASTER_PASSWORD='repl';

Staging the InnoDB Slave with Data
Now you need to stage the InnoDB slave with data. What you need to do is to disable traffic to NDBCLUSTER in order to get a consistent snapshot of the data. As there are no clusterwide table locks in NDBCLUSTER you have two options:
  1. Block the Loadbalancer from sending any transactions to MySQL Cluster
  2. Make all SQL nodes READ ONLY, by locking all tables on ALL MySQL servers (if you use NDBAPI applications, then option 1) or shutting down the applications is the the only option):  FLUSH TABLES WITH READ LOCK;
So on all MySQL Servers in the Access Layer do:
FLUSH TABLES WITH READ LOCK;

Ensure, by looking at the replication server,  that no writes are made to the NDBCLUSTER by looking at the SHOW MASTER STATUS:
mysql> show master status;
+---------------+-----------+--------------+------------------+
| File          | Position  | Binlog_Do_DB | Binlog_Ignore_DB |
+---------------+-----------+--------------+------------------+
| binlog.000008 | 859092065 |              |                  |
+---------------+-----------+--------------+------------------+
1 row in set (0.00 sec) 
Run the SHOW MASTER STATUS; a couple of times until you see the Position not changing any more

Then RESET the replication server, so you have a good clean slate to start from:
mysql> RESET MASTER;

Now use mysqldump two times to get  :
  1. one dump with the schema
  2. another dump with the data 
mysqldump --no-data --routines --trigggers > schema.sql
mysqldump --no-create-info --master-data=1 > data.sql

Of course you can dump out only the databases you are interested in.


When the dumps have finished, you can enable traffic to NDBCLUSTER again. You can do on ALL SQL nodes:

UNLOCK TABLES

Point is that you can enable traffic to NDBCLUSTER again.

Now, change the ENGINE=ndbcluster to ENGINE=innodb in schema.sql:

sed -i.bak 's#ndbcluster#innodb#g' schema.sql

Copy the schema.sql and data.sql to the slave, and load in the dump file to the InnoDb slave.

Finally you can start replication, on the InnoDB slave you can now do:

START SLAVE;
SHOW SLAVE STATUS \G

And hopefully all will be fine :)

Thursday, August 30, 2012

MySQL Cluster: Too many active scans


Continuing with another blog about troubleshooting MySQL Cluster we will look at a common error message: "Too many active scans".

Now, you have already set MaxNoOfConcurrentScans=500 in your config.ini, and you can't increase it more (the max is 500), but you still get this error. Frustrating!

But looking into the code, it is not MaxNoOfConcurrentScans that sets the limitation, it is actually MaxNoOfLocalScans and the "Too many active scans" comes from the Local Query Handler of the NDB node, and that is where MaxNoOfLocalScans is used!

So what you can try to do is to actually set/increase MaxNoOfLocalScans, and if it is not set already in your config.ini, the default value is calculated as:

In 7.2.0 and later:
MaxNoOfLocalScans= tcInstances * lqhInstances * noOfDBNodes * 
                   MaxNoOfConcurrentScans + 2
So if we have tcInstances=1, lqhInstances=4, noOfDBNodes=4, and MaxNoOfConcurrentScans=500 we get
MaxNoOfLocalScans=1*4*4*500 + 2 = 8002

Earlier versions:
MaxNoOfLocalScans = (noOfDBNodes * noOfScanRecords) + 2 ,

So if we have noOfDBNodes=4, and MaxNoOfConcurrentScans=500 we get
MaxNoOfLocalScans=4*500 +2 = 2002

If you use our configuration packages, then you can simply just increase/set the MaxNoOfLocalScans and do:
./rolling-restart.sh

Good luck!